
ショコラ
Livewire アクションメソッドからHTMLにイベントを送るには?liveevent1
ライブワイヤーコンポーネントのメソッド内で「$this->emit()」でキメマス。

もっさん先輩
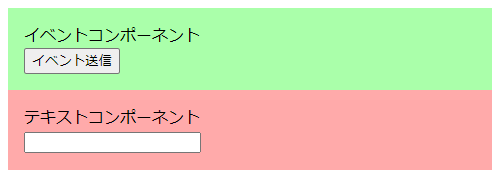
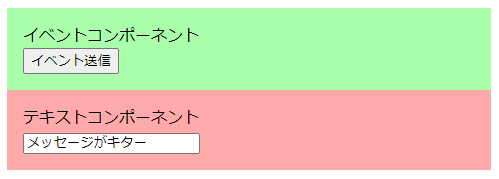
完成は↓こちらです。
手順
Laravel と Livewire をインストールして、ライブワイヤーコンポーネントのアクションメソッドから、イベントを送信して HTMLでイベントを受信してみましょう。
- プロジェクト名(liveevent1)を決めて以下のコマンドを実行します。
curl -s https://laravel.build/liveevent1 | bashインストール時にプロジェクト名のディレクトリが作成されます。
- インストールの最後に sudo でパスワードの入力を求められます。
↓下のメッセージが表示されてインストールは終わります。
Use 'docker scan' to run Snyk tests against images to find vulnerabilities and learn how to fix them

Get started with: cd liveevent1 && ./vendor/bin/sail up- sail のエイリアスを定義します。
echo "alias sail='[ -f sail ] && sh sail || sh vendor/bin/sail'" >> ~/.bashrcsource ~/.bashrcLaravel のインストールはここまで。
- 「sail up」でコンテナを起動します。
cd liveevent1 && sail up -d- ララベルのトップディレクトリで、Livewireパッケージをインストールします。
sail composer require livewire/livewire- Livewire のクラスとビューを作成するため、ディレクトリを作成します。
mkdir app/Http/Livewire/
mkdir resources/views/livewire- ライブワイヤーのイベントコンポーネントを作成します。app/Http/Livewire/EventComponent.php
<?php
namespace App\Http\Livewire;
class EventComponent extends \Livewire\Component
{
  public function render() {
    return <<<'EOS'
      <div style="padding:1em;background-color:#AFA;">
        イベントコンポーネント<br>
        <button wire:click="click">イベント送信</button>
      </div>
      EOS;
  }
  public function click() {
    $this->emit('message',$this->id.' からメッセージがキター');
  }
}
↓wire:click に $emit を書いてイベントを発生させることもできます。app/Http/Livewire/EventComponent.php
<?php
namespace App\Http\Livewire;
class EventComponent extends \Livewire\Component
{
  public function render() {
    return <<<'EOS'
      <div style="padding:1em;background-color:#AFA;">
        イベントコンポーネント<br>
        <button wire:click="$emit('message','{{ $this->id }} からメッセージがキター')">イベント送信</button>
      </div>
      EOS;
  }
}- ライブワイヤーのテキストコンポーネントを作成します。app/Http/Livewire/TextComponent.php
<?php
namespace App\Http\Livewire;
class TextComponent extends \Livewire\Component
{
  public $value;
  public function render() {
    return <<<'EOS'
      <div style="padding:1em;background-color:#FAA;">
        テキストコンポーネント<br>
        <input type="text" wire:model="value">
      </div>
      EOS;
  }
  protected $listeners = ['message'=>'onMessage'];
  public function onMessage($value) {
    $this->value = $value;
  }
}- ライブワイヤーをテストするビューを作成します。resources/views/liveevent.blade.php
<!DOCTYPE html>
<html>
  <head>
    <meta charset="UTF-8">
    <livewire:styles />
  </head>
  <body>
    <livewire:event-component />
    <livewire:text-component />
    <livewire:scripts />
<script>
window.Livewire.on('message',message => alert(message))
</script>
  </body>
</html>- routes/web.php にルートを定義します。
Route::get('/',fn() => view('liveevent'));- ブラウザでアクセスしてみましょう。

「イベント送信」ボタンを押すと、
①wire:click で EventComponent の clickメソッド が呼び出され、その中で messageイベント を発生させます。
②HTML の 「Livewire.on」で messageイベント を受信して、「メッセージがキター」のアラートを表示します。
③ TextComponent のイベントリスナーでも messageイベント を受信して、画面に値を表示します。
以上